How to stain deck in 8 easy steps.

Updated

By Sherra Vorley

Some people consider a deck a must-have for outdoor entertainment, grilling or just kicking back with a cup of tea and a good book. However, without knowing a bit about how to properly care for and maintain your deck, you could inadvertently be shortening its lifespan.

A wood deck is exposed to the elements 24 hours a day, all year round. Rain, snow, sun, wind – they all take a toll on wood decking. High humidity and shade can damage your deck with moss, mildew and rot. Fluctuating temperatures and moisture levels can cause wood to shrink and expand, deteriorating your surface. Dry winds and hot sun can make the wood brittle. Oh, and don’t forget about those pesky stains from spilled wine, melted popsicles, and greasy burgers.

If you haven’t stained your deck, now may be the time. Staining a deck not only protects the wood from weather and wear and tear but also looks fantastic and improves your outdoor enjoyment. Plus, a perfectly stained deck will improve your property value.


What do you need for deck staining?

Plan to stain your deck over the course of two days, and remember that you will need excellent weather for this project. The stain will need 24 rain-free hours to cure, and the best temperature in which to apply deck stain is 50° F to 90° F. Try to apply stain when the deck is not in full sunlight so it doesn’t dry too fast. This allows for even curing.

You can apply deck stain with a variety of tools and equipment, including:

  • Exterior wood deck stain (optional: a combined stain-and-sealant product)
  • Sealant (if stain doesn’t contain sealant) 
  • Broom or shop vac 
  • Roller
  • Cloth
  • Foam brush
  • Stain pad
  • Pole or extension handle
  • Bristle brushes
  • Airless paint sprayer
  • Sanding tool 
  • Pressure washer
  • Large bucket(s)
  • Stirring sticks
  • Roller tray
  • Painter’s tape
  • Safety mask
  • Goggles
  • Clear plastic

Bristle brushes are excellent for accessing hard-to-reach areas, and a roller can cover larger surfaces quickly. Use a staining sponge or pad attached to the end of a pole for an even finish and to give you more control. An airless paint sprayer requires experience but is also an effective way to stain a deck with stunning results.

How to stain your deck.

With your deck stain and tools in hand, you’re ready to start staining. Follow these steps:

Step 1: Clear your deck and protect your home’s exterior. 

how to stain a deck step 1

Remove any furniture, potted plants, toys and grills to expose the deck’s entire surface. Use painter’s tape and clear plastic to protect your house’s exterior, siding and landscaping.

Step 2: Sweep up.

sweep deck before stainingYour deck needs to be thoroughly cleaned before staining. Clean wood absorbs the stain, and the stain in turn protects the wood. If the wood is still dirty from the outdoor elements, the stain may not spread evenly or stick properly. For best results, remove built-up mold, mildew and dirt — along with any previous coatings or stains.

Give your deck a good sweep to clear up debris and leaves. A shop vac is a handy tool for sucking up hard-to-reach debris in the cracks and crevices between boards.

Step 3: Apply a deck cleaning product, scrub and rinse.

cleaning before deck stainingThe level of cleaning required will depend on the state of the deck. If the deck has layers of stains, mildew and weather damage, a high-powered pressure wash will quickly and easily expose the wood’s surface. A wood-cleaning product applied with a roller or pump sprayer may do the trick on a well-maintained deck.

A pressure washer has several sprayer options. Start in an inconspicuous area of the deck to find the best setting for the type of wood and level of cleaning required. Keep the nozzle about 8 to 12 inches from the deck boards and at a 45-degree angle. A pressure setting of 1200 to 1400 PSI (pounds per square inch) should be effective. Spray along the grain of each board to remove dust, dirt, wood fibers and grease.

While deck-cleaning products will have specific instructions to follow, you’ll generally need to wet the deck boards thoroughly ahead of applying cleaning agents. Dry wood may absorb cleaning products, which may degrade your wood’s color and limit the absorption of deck stain. 

Apply the cleaning product liberally with a pump sprayer or roller. Avoid contact with skin and eyes by wearing protective clothing and goggles. Brush the cleaner onto the wood with a synthetic-bristle brush for the best effect. Allow the cleaner to set for the required time, which is usually about 15 minutes. Rinse cleaner completely away with a garden hose. Any cleaner sprayed on plants or house finishes should be well rinsed off as well.

Step 4: Sand your deck.

sanding before deck staining

Allow the deck to dry entirely. This may take 36 to 48 hours, depending on the weather and humidity. Next, use a sanding tool (like a rotary sander or sanding paper) to remove any remaining stains or damaged wood. If exposing new, lighter-colored wood, lightly feather the sanded area.

Step 5: Double-check for any deck damage and make repairs.

deck repairsBefore applying stain to your clean, dry deck, check for any damaged boards or raised nails or screws. Replace any problematic boards, and countersink nails and screws. This is also a great time to assess your deck’s integrity for any damage to the framing material. If in doubt, seek a professional assessment to ensure your deck is safe and reliable. 

After a final sweep of debris, it is time to start deck staining.

Step 6: Prepare the deck stain — and make a plan.

prepping deck stainThe stain should be thoroughly stirred each time you pour it into a paint tray. Avoid shaking the stain, which may cause bubbles to form and show up in your stained wood decking. Next, choose a patch of wood in an unnoticeable area to test. Test your stain to make sure you like the finished color and appearance.

Now it’s time to start planning out your deck staining sequence. Start at the farthest area from your exit to avoid staining yourself into a corner. Use a brush to cut in around the edges of your deck and access hard-to-reach areas. Finally, keep in mind that two thin coats are better than one uneven, thick coat when staining a deck.

Step 7: Apply the deck stain. 

how to stain a deckUse a bristle brush, paint pad or airless paint sprayer to apply stain to railings, posts and balusters. Cover the deck surface to avoid drips and protect the deck from splotches. Use long, even strokes — and cover each side of spindles, railings and posts.

When staining your deck boards, cut in corners and edges with a brush. Stain any cracks and hard-to-reach areas. Apply stain in long sections, three or four boards at a time. Ensure an even coat by using a broom or roller to spread out any stain that collects or puddles. This will also help to work the stain into the wood.

Stain the deck’s stairs last, after you tackle the railings and deck surface. Using a brush or handheld stain applicator, apply a thin coat on stair risers and treads. Look for any missed areas. Walk around the deck, and make sure any out-of-sight areas are cleaned and stained as well. Allow the stain to dry for at least 24 hours between coats.

Step 8: Clean up and let the deck dry.

wood deck after stainingWhen the deck’s entire surface, railings and stairs are stained, clean your applicators, brushes, rollers and paint trays. Carefully remove your painter’s tape and clear plastic protection.

Allow the stain to dry for at least 24 hours before walking on the freshly stained deck or replacing furniture, grills, plants or toys.

If your deck staining product doesn’t contain sealant, you should apply a sealant after 48 hours. 

Deck maintenance tips to remember.

A well-maintained deck will last longer than a poorly maintained one. And now that your beautiful deck has been freshly stained, take these easy steps to keep it looking great:

  • Keep your deck swept and free of debris. Piles of leaves can trap moisture and pests that are destructive to wood decks.
  • Use outdoor mats or area rugs to protect high-traffic areas.
  • Move furniture and mats around occasionally to keep areas from getting discolored by sunlight and moisture.
  • Wash your deck in the spring to remove debris or residual de-icing salt.
  • Inspect and repair your deck annually. Look for signs of rot, mold and mildew. 
  • Check underneath the deck and where the deck attaches to the house and repair any damaged boards. If you’re unsure, call a professional to inspect and repair your deck.
  • In the fall, prune shrubs and trees to avoid their contact with the deck during cold and wet seasons.
  • Remove snow during the winter to avoid your wood buckling or sagging under the weight. Snow removal also helps prevent moisture from seeping into wood boards as snow melts.
  • Add shade to your deck. Consider adding a pergola, umbrellas and other types of coverings to help protect your deck from the sun.
  • Re-stain or seal your deck every three years or so. Depending on the type of stain you use (and your deck’s condition) you may be able to extend the time in between stainings.

When to contact a pro to stain and maintain your deck.

deck staining

Great weather is required for staining a deck — and you may have many other demands on your time during great weather. In this case, many experienced professionals are experts at deck staining in your area. Professional deck maintenance will give you the professional results you are after. 

Here are a few reasons you might want to hire a pro to handle this task for you:

  • You’ll save time. Time is of the essence for deck staining, and hiring a deck staining professional is the perfect way to take this necessary home maintenance task off your to-do list.
  • A professional can also complete repairs. Not only will you get the results you desire, but a deck contractor will use their expert knowledge to assess and fix any safety issues and structural damage.
  • You don’t have to buy new tools. Unlike some outdoor maintenance tasks, deck staining requires its own set of skills and tools. Hiring a professional rather than investing in tools (and contributing your own sweat equity), might be the more budget-friendly option.
Get a free estimate from a great deck stainer near you.

FAQs

When is the best time to stain a deck?

Typically, the best time to stain your deck is in the spring or fall when the temperatures are between eteen 50° F and 90° F, and it won’t be raining over the next couple of days. 

You may be able to stain your deck in the summer. Just make sure you don’t attempt this project in direct sunlight or when it’s too hot otherwise. Otherwise, you risk having the stain evaporate before it can penetrate the wood. 

You should also avoid staining after it’s been raining. If you try to apply stain to wet or damp wood, which won’t absorb the stain well, it may end up cracking and peeling.

Pro tip: It may be time to stain deck boards if water no longer beads on the surface.

What is the best way to apply stain on a deck?

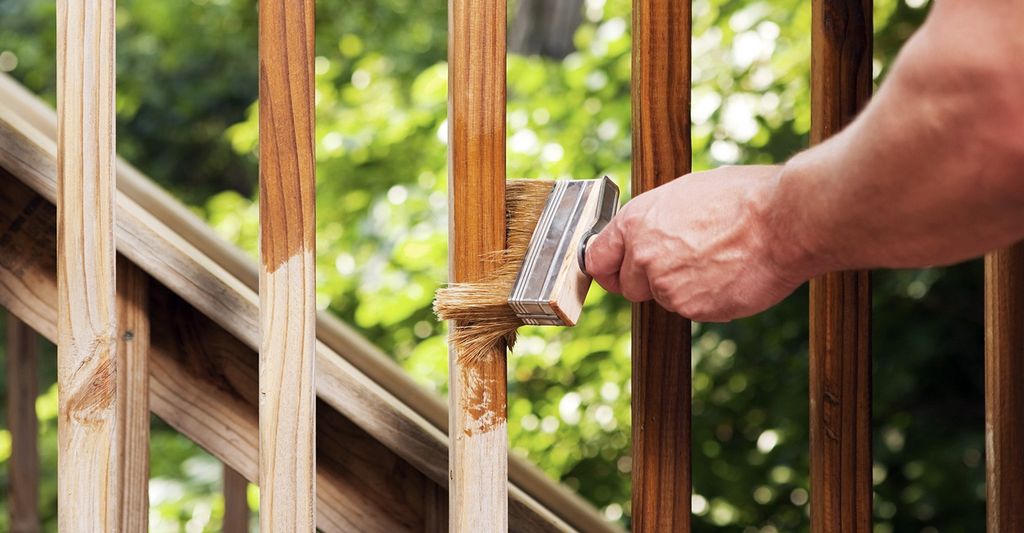
A brush and roller are the two most common applicators for deck staining. A roller will help you get the job done faster — but a brush is a more effective, accurate way of deck staining. 

If you have enough experience, a stain can be applied quickly and evenly with an airless paint sprayer. For small decks, a stain can be applied simply with a brush. Larger areas can be efficiently covered in smooth, even layers of deck stain with a roller or stain pad attached to an extended handle.

Should I use a brush or roller to stain my deck?

You can stain your deck using a brush or roller. A brush is perfect for getting into hard-to-reach areas, cutting in edges and brushing the stain into cracks and crevices. The downside of applying stain to your deck with a brush is that it is labor-intensive for large areas. 

A roller is better for staining a deck with a large surface area. Rollers can also be attached to extended handles. This can make the job easier because you can stain a deck from a standing position. 

Both tools are necessary for all aspects of deck staining to achieve professional results. It never hurts to consult a professional, as they will know the best ways to stain a deck in your area.

Do you have to sand a deck before staining?

Deck stain will adhere the best to wood that’s clean, dry and free of stains and splinters. After you have cleaned your deck thoroughly, you may find there are areas where the wood is damaged or stained. Residual stain or paint on areas of the deck will need to be removed. Sanding those areas is a fast and effective way to remove old stains, smooth out rough damaged wood or clean up grease spots or spills.

It may not be necessary to sand the entire deck. A small orbital sander or a hand-held sanding tool will help buff out damaged areas. Feather out sanded areas for a consistent look throughout deck boards. 

However, a thorough sanding of an entire deck may be in order when a complete restoration is needed for an old, neglected deck.

Do you wipe off deck stain?

Deck stain needs to be applied in thin, even layers to cure properly. You can wipe off the deck stain when it is too thick. Overapplication of deck stain will not cure well. 

When staining a deck, work in small sections. Even better, have a partner help you. As deck stain is applied, you or your partner will use a tool such as a synthetic bristled broom to spread any thickly applied stain and work the excess deck stain into the wood.

Remember: it’s important to avoid staining a deck in the hot sun. The stain will dry too quickly, making it difficult to spread out or wipe off areas of deck stain that are too thick.

Can you stain over stain on a deck?

There are a few things to consider if you want to stain over an existing stain on a deck. Simply, yes, you can stain over the same stain on a well-maintained deck surface. A deck that was stained in the last year or so and is in good condition may be perfect for a maintenance coat of stain. This will help extend your deck’s life and keep it looking new.

However, do not stain over an existing stain if the deck wood is damaged and needs repairs. And a new coat of stain applied over an old coat of a different color (or type) may not adhere properly. In the worst case, you might end up having to strip off the new stain along with the old stain to get the professional-looking results you desire.

How many coats of stain should you put on a deck?

One to two coats of stain are all you should need to put on your deck. As a rule, stain a deck until it no longer absorbs deck stain. 

Clean, dry wood decking will absorb the first layer of stain deep into the grains of wood. This may be enough to protect the wood deck from the elements. Different types and ages of wood may thirst for a second coat of stain. While newer or denser wood may require only one coat, follow the product’s directions. Deck stain manufacturers will recommend how many coats to apply for your situation.

Find local pros for your project

Tell us what you’re looking for and we’ll show you pros right for the job, with prices.